Monday, December 11, 2017

Wintertime Magnetic Poetry repost from Eric Curts

  • Make a copy of the Google Drawings "Wintertime Magnetic Poetry" template - Google Drawing template
  • In the middle of the template is the wintertime background where the students will add the words for their poem, story, or creative writing piece.
  • On the left side of the template are 100 standard (non-themed) words in alphabetical order.
  • On the right side of the template are the 86 wintertime themed words in alphabetical order.
  • Drag and drop words from the left and right sides onto the middle work area. Drag around the words as needed to place them where you want.
  • If you need more than one copy of a word, simply copy and paste it. 
  • If you need to edit an existing word, just double-click inside the text box and make the changes you want.
  • If you want to add your own words, double-click inside of any of the blank text boxes and type in the word you want.
  • When done you can share or download your creation (click "File" then "Download" then "PNG image")

Friday, December 8, 2017

Some tools for giving students a voice


Thankfully today technology provides us with many tools for students to participate in class, share their ideas, ask questions, and explain their understanding. Students can communicate through backchannels, various email platforms, chats, blogs, Google Forms, Classroom stream posts, recorded videos, slideshows, stories, diagrams, animations, songs, and much more.

https://padlet.com/

Google Forms: https://www.google.com/forms/about/


blogger.com


Monday, December 4, 2017

Repost from Eric Curts: Building a Snowman in Google Slides

Build a Snowman with Google Slides

Do you want to build a snowman?

Well now you can with this fun, and educational, Google Slides activity. This is a great way for students to be creative and to work on their writing skills by describing or writing about their snowman.

Here’s how:

  • Make a copy of the Google Slides “Build a Snowman” template, found further down in the blog post.
  • The template has a blank snowman and several slides full of items to add to your snowman including eyes, mouths, hats, arms, feet, hair, and more.
  • Copy and paste the items to build your snowman.
  • If you need different pictures, you can search for more.
  • When done building, write about your snowman or snowwoman in the textbox. You can describe them, tell a story about them, or explain who they are.
  • When all done you can download a picture of your snowman and writing to share with others.

See below to get your own copy of the template, as well as more detailed directions and a video tutorial on how to do the activity.


Get a copy of the template

This activity is created with Google Slides. To get your own copy of the template simple click the link below.

  • “Build a Snowman” template - Google Slides link
    (Original version with movable snowman.)
  • “Build a Snowman” template - Google Slides link
    (Version 2 where snowman cannot be moved. May be easier for younger children.)

Your students can click this link to get their own copy, or you can use Google Classroom to push out a copy of the template to each of your students.


What’s in the template

The Google Slide template has multiple parts for the activity. These include:

Slide 1 - The title slide

Slide 2 - A brief set of directions

Slide 3 - The blank snowman. This is where you will build your snowman (or snowwoman) and where you will write about them.


Slides 4 through 10 - Items for building your snowman. These slides contain images that you can copy and paste onto your blank snowman. The items are grouped on the slides by topic including Eyes, Mouths, Arms, Feet, Hats, Hair, and Extras.


Building your snowman

To build your snowman, simply copy and paste images from the items slides onto your blank snowman. You can copy and paste in several ways.

To copy an item:

  • Click on the picture and press “Ctrl” and “C
  • Or click on the picture and click “Edit” then “Copy” in the top menu bar.
  • Or right-click on the picture and choose “Copy” from the pop-up menu.

To paste an item, go to the snowman slide and:

  • Press “Ctrl” and “V
  • Or click “Edit” then “Paste” in the top menu bar.
  • Or right-click and choose “Paste” from the pop-up menu.


Once your item has been pasted in you can adjust it in many ways:

  • Drag and drop it to move it around.
  • Press the arrow keys on your keyboard to move it around.
  • Hold down the “Shift” key and press the arrow keys on your keyboard to move it one pixel at a time.
  • Click and drag the blue circle on top of the image to rotate the image if needed.
  • Click “Arrange” in the top menu bar, then “Rotate” and “Flip horizontally” or “Flip vertically” if needed.
  • Click and drag the corners of the image to change its size if desired.
  • Click “Image options” in the top menu bar, and then “Recolor” to adjust the color (works better for lighter colors).


Adding your own images

Although the template provides a large variety of items to use for your snowman, you may still want to add some more of your own. You can add more images as follows:

  • Click “Insert” in the top menu bar, then click “Image”.
  • You can add an image in several ways including “Upload” or from your “Google Drive” or with a “Search
  • If you use the “Search” option, you may want to choose “Clip art” from the “Any type” drop down menu to limit your results to clip art style pictures.


Writing about your Snowman

When you are done creating your snowman, now you will want to write about him (or her). You can type in the textbox to the right of your snowman to enter your own writing. This could include:

  • A description of your snowman.
  • A story about your snowman.
  • An explanation of who your snowman is and/or what he does.
  • Be sure to include your name at the bottom of your writing.


Downloading your Snowman

When you are completely done, you can download a picture of your snowman and your writing as follows:

  • Make sure you are on the slide that has your completed snowman and your writing.
  • Click “File” in the top menu bar.
  • Choose “Download as” from the drop-down menu.
  • Choose “PNG image” from the sub-menu.
  • This will download an image of just the slide you are on and not any of the rest of the slideshow.


You can now share your image in several ways:

  • Email it to someone.
  • Turn it in through Google Classroom.
  • Post it on your class website.
  • Share it through social media.
  • Combine it with others to make a new slideshow with everyone’s creations.


Conclusion

The “Build a Snowman” Google Slides activity can be a great way to let kids be creative and to improve their writing at the same time. One of the great things about creativity, is you never know what students will come up with. Below are a few examples of what my boys and I created.


Feel free to email me images of your students’ creations. I would love to see what they make and will be glad to share some examples here to inspire others.

Post by Eric Curts. Connect with Eric on Twitter at twitter.com/ericcurts and on Google+ at plus.google.com/+EricCurts1

EquatIO is FREE!

EquatIO® is now Free for Teachers!


As an early holiday present to all of you incredible teachers out there, we are excited to announce that EquatIO is now FREE for teachers!


EquatIO is our easy-to-use software solution that enables students at all levels to create digital equations, formulas, geometric shapes, graphs and more directly on their computer or Chromebook.

Our goal in launching EquatIO earlier this year was to truly make math digital and accessible for all students. As EquatIO’s popularity has grown, we’ve come to realize that in order to achieve this goal, we simply must allow all teachers to use all features of EquatIO for free.

After all, how can a student fully benefit if the teacher is limited in how they can engage their students? That’s why we have decided to make EquatIO free for teachers.

Through our Free for Teachers program, teachers will be able to get the following premium features at no additional cost:
  • Unlimited handwriting recognition
  • Math, Chemistry and Formula Prediction
  • Integration in Google Forms, Slides, Sheets & Drawings
  • Dynamic graphing
  • Shapes input in EquatIO mathspace
Plus, we are constantly adding new features to EquatIO, so as those become available, you will get them for free as well!
 

Here’s how it works:

If you are a teacher and do not already have EquatIO, head to our website and install it on the platform or platforms of your choice. Pro tip: Don’t forget what email address you used to install EquatIO - this will come in handy later. Once you’ve installed EquatIO, you can then register for Free for Teachers.

If you are a teacher and already have a subscription to EquatIO (either the 30-day trial of premium or the free version), all you have to do is register!

To register, visit www.texthelp.com/freeforteachers and fill out the form with all the required information. Be sure to use the same email address that you used to install EquatIO! If you are interested in trying our literacy support tool, Read&Write, you can sign up to get it free-of-charge through this form as well.

That’s it! Once confirmed, your EquatIO subscription will automatically be converted into a Free for Teachers premium license.

We hope you enjoy!

Monday, November 27, 2017

Repost from EdTech & Mobile Learning


1- Google Arts and Culture
‘Keep exploring with Google Arts and Culture. Meet the people, visit the places and learn about the events that shaped our world. Discover collections curated by experts from the most famous museums. Be moved by stories depicted in thousands of photos, videos, manuscripts and artworks on every type of screen and in virtual reality.’

2- Touch Van Gogh
‘This app allows you to explore the wealth of information contained in and under the paint in Van Gogh’s masterpieces. Simply ‘touch’ Van Gogh’s art works and let the paintings tell their stories. The surprises in store include revelations about recycled canvases, discoloured pigments and Van Gogh’s use of a perspective frame.’

3- Kids Art Gallery: With Poems and Music
‘People who experience art masterpieces as a kid grow to have interest in colors, lights, shapes and even every object around us. [Kids Art Gallery] is created for kids to experience art in a more fun and easy way! The cute little characters dance and play inside the artwork while the narrator recites a rather whimsy poem about the scene. These poems are actually written by kindergarteners aged 3-6. There are also commentaries based on real stories of the artwork to help kids understand the masterpieces.’

4- AP Art History Practice and Prep
‘Students can utilize the free Varsity Tutors AP Art History app for iPhone and iPad to get up-to-speed on the expansive history of art. Test-takers will be drilled on important pieces of art and their functions from the prehistoric, ancient Mediterranean, colonial American, later European and American, and indigenous American time periods. Students will also be required to have knowledge of Asian, Pacific, African, and global contemporary art influences.’

5- Explorer: The American Museum of Natural History
‘Download Explorer for a new way to experience the American Museum of Natural History (AMNH) in New York City! Enjoy behind-the-scenes stories about exhibits, captivating interactives, stimulating quizzes and more.’

6- Love Art: National Gallery, London
‘The National Gallery in London houses one of the greatest collections of Western European painting in the world. These pictures belong to everyone and are presented here for you to enjoy and keep with you at all times.’

Sunday, November 19, 2017

iOS 11 upgrades!


RePost from Ctrl/Alt/Achieve--Force a doc with pre-loaded comments

How to Force a Docs Copy WITH Pre-Loaded Comments to Help your Students

We are always looking for new and improved ways to provide additional assistance to our students when they are doing digital work. Recently Google rolled out a new feature in Google Docs that, with a little tweaking, can give teachers new ways to provide support for students in their assignments.

The new option is available when you make a copy of a Google Doc. With this update you are now able to also copy any comments that are in the document. This is a great feature for you as an individual to keep comments in the copies you make. However, this can also be a creative way to provide additional resources, links, and assistance to your students in their projects.

Instead of just getting a copy of a worksheet, HyperDoc, study guide, or other document, students can also have comments pre-loaded into their copy of the document. These comments can provide them with:

  • Additional directions
  • Hyperlinks to resources
  • Voice recordings from the teacher
  • checklist of items for the student to resolve
  • And more

See below for details on the URL trick you can use to force a copy of a document with the comments included, as well as several examples of how this could benefit students.


The New Feature

Before we take a look at the trick, let's start by seeing how this new feature works normally. When working on a document, people with edit rights or comment rights are able to leave comments in the margin. To do this you simply select some text, then click the "Add a comment" button that pops up on the right, and then type in your comment. This is a standard feature we have had for a long time.

The problem in the past has been when you go to make a copy of the document. Previously you could make a copy of a document, but the comments were not included. Now we have an option to do that. Here's how it works.

  • Open a document that you have edit rights or comment rights to.
  • This will need to be a document with some comments in the margin, entered by you or someone else.
  • Now click "File" in the top menu bar.
  • Then choose "Make a copy".
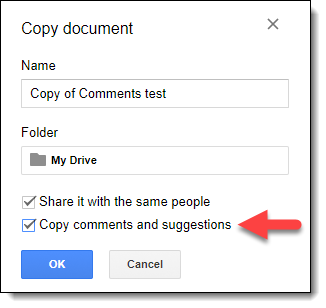
  • The "Copy document" window will now open.
  • Check the box for "Copy comments and suggestions".
  • Click "OK".

You will now have a new copy of the document, along with all the comments that were in the original Doc.

This works great for one person. But what if you want to automatically do this for your students, so each student gets a copy of the document with all the comments copied as well. We will see how to do that now.


Force a Copy with Comments

For a long time we have known about a trick to force a copy of a document when someone clicks on a link we give them. The basic idea has been to slightly change the web address (URL) of the shared link for the document, changing the "/edit" and the end of the link to "/copy" instead. (Tony Vincent has a great blog post where he covers this URL trick as well as several others.)

That trick works great for forcing a normal copy of the document, but it does not include the comments in the copy. So how can we force a copy with the comments included?Here's how…

Step #1 - Share the document as a link with comment rights

To be able to force a copy of a document with comments, first the document has to be shared so that anyone can make comments on it. If you do not do this, the end user will not have the needed rights to get a copy with the comments included.

  • With the document open, click the "Share" button.
  • In the "Share with others" window, click "Get shareable link".

  • This will only give view rights to others. You still need to change this to comment rights.
  • Click "Anyone at [your school] with the link can view" and choose the "can comment" option instead.

  • Note: If you want the document to be copied outside of your school, you will need to click the "More" option, and then choose "Anyone with the link" and "Can comment".
  • Finally copy the shareable link and click "Done" to close the window.


Step #2 - Modify the Shareable Link

Now that you have the shareable link for your document, you need to make a small adjustment to it. Currently your link should look something like this:

https://docs.google.com/document/d/[a bunch of stuff]/edit?usp=sharing

At the end of the link you will see a portion that reads:

/edit?usp=sharing

What you need to do is change that final portion. However, changing it from "/edit" to "/copy" is not enough as that only makes a copy of the document, not the comments. Instead you need to:

Delete the end of the URL where it reads:

/edit?usp=sharing

And replace that with

/copy?copyComments=true

The extra code "?copyComments=true" after the "/copy" is what forces the comments to be copied as well.


Step #3 - Give the New Link to Others

  • Finally you want to give the new, edited link to your students or other end users.
  • You can distribute the link as an announcement in Google Classroom, or in an email, or as a link in a shared document, as a QR code, or such.
  • Now anyone who clicks on that links will get their own copy of the document, along with all of the comments that were already in the document.


Sample Document

As an example of how this could be used, I have created a very simple Google Document that teaches about lines of symmetry. In the document I have added several comments with additional directions, helpful hyperlinks, voice recorded instructions, and such.

To get your own copy of this document, along with the comments, click the link below:


Example Uses

So how could it be beneficial for students to get a copy of a document with comments already pre-loaded? Here are just a few possible ideas:

Use #1 - Additional Directions

You could use comments to provide more details and instructions for students as they are completing the assignment in Google Docs. Instead of cluttering up the actual document itself, these helpful hints and directions could be added as comments in the margin.

Use #2 - Hyperlinks to Resources

Comments also allow you to include hyperlinks. You could add comments to the document that provide students with links to websites, videos, or even other documents. These links could be used for additional help and remediation, or could be enrichment resources for students who want to dig deeper into the topic.

Use #3 - Checklist of Tasks

One neat feature of comments is the option to "resolve" them. When you select a comment, there is a "Resolve" button you can click to mark the comment as complete and hide it.

As a teacher you could add comments that walk the student step-by-step through the project. As the student finishes each section of the document, they could click the "Resolve" button for the comment attached to that section. This would be a useful way for the student to mark off their tasks as they complete them.

Use #4 - Recorded Voice Comments

A particularly awesome use for copied comments, is to add your own recorded voice to the comments in the document. This can be used to:

  • Read the directions aloud for students who may have difficulty reading.
  • Provide additional clarification beyond the written directions.
  • Add a personal touch to the document by adding your own voice.

Adding a comment with a voice recording can be done easily with the "Read & Write for Google Chrome" web extension. The extension provides you with a toolbar that has many features, one of which is the "Voice Note" feature that allows you to record spoken feedback for the document.

  • First begin by installing the extension: Chrome Web Store link
  • Note: Because this is a Chrome Extensions, you need to be using Chrome on a PC, Mac, or Chromebook to be able to use this tool.
  • Read&Write has a free version and a paid version, but as an educator you are allowed to use the full version at no cost. To be able to use the "Voice Note" feature, make sure you register as a teacher for the full version using this link - https://www.texthelp.com/en-us/products/read-write/free-for-teachers/

Once you have the extension installed you can use it as follows:

  • Click the Read&Write button to pull down the toolbar.
  • Now select the text you want to leave a voice comment for.
  • From the Read&Write toolbar click the "Voice Note" button (on the right end of the buttons).


  • This will open a tool where you can click the microphone button to record your voice for up to 1 minute.
  • When done, click the stop button, and then "Insert" to add your recorded comment to the document.


  • Repeat as needed to add as many voice comments as desired.
  • Note: Your students do not need the Read&Write extension installed to be able to hear the recorded voice comments. All they have to do is click the link in the comment to play back your voice recording.


Conclusion

Although we normally think of comments as something we add after a student has completed an assignment, that doesn't have to be the case. We can also pre-load comments for students and force the comments to be copied along with the original document. This can be a great way to provide additional resources and help for our students when working on their projects.

What other uses can you think of for copying comments along with a document? Share your ideas below.


Post by Eric Curts. Bring me to your school, organization, or conference with over 50 PD sessions to choose from. Connect with me on Twitter at twitter.com/ericcurts and on Google+ at plus.google.com/+EricCurts1

Sunday, November 12, 2017

iPad Academy Resources

We've been hearing many a wondering about iMovie lately. We've got just the thing for you! Check out our resources from iPad Academy 2015.

HESD App List

https://docs.google.com/document/d/1nwRq-KAiR9Y3Ai_YClDqzwVyq_RjfbWvIIP958ETNJI/edit?usp=sharing

Tuesday, October 17, 2017

If you haven't hit play on Google.com today.....do so!

For millions of fans, Selena Quintanilla is still very much alive through her music and her legacy. And now the Queen of Tejano music, whose life was tragically cut short when she was murdered at age 23 in 1995, is getting a special online tribute -- a Google doodle, commemorating Selena, her solo debut album, released on October 17, 1989.
“What a great way to celebrate an icon. I think it will bring great joy to all her fans who follow her and look up to her as a role model,” says Suzette Quintanilla, sister of the late beloved singer. “Selena would be so excited. It’s such an honor.”
The idea of a Selena doodle was first submitted two years ago. “This is someone I looked up to my entire my life and I wanted to create something special,” says Perla Campos, Global Marketing Lead for Google Doodles, who considered the singer a role model who helped her embrace her cultural identity while growing up.

The Selena doodle is animated to the tune of the popular “Bidi Bidi Bom Bom.” That song, says Campos, “embodies her power and how talented an artist she was.”
The Google team worked closely with the Quintanilla family to make the doodle, and to launch a special Selena exclusive content collection within Google’s online Arts & Culture Exhibit.
“People will be able to see personal artifacts from the Selena museum,” says Quintanilla. “Every year, people come from all over the world to see her things at the museum, which is housed in our production company [in Texas]. Now, they’ll be able to see many of her outfits and personal belongings online. This is a perfect example that her memory is very much alive and her legacy is growing. She’ll never be forgotten.”
Selena Google Arts and CultureGoogle
This image is one of many in the special Selena exhibit in Google's Arts and Culture section.
The Selena doodle will be on the Google homepage in the United States as well as Mexico, Nicaragua, Guatemala, Honduras, El Salvador, Dominican Republic, Puerto Rico, Bolivia, Ecuador, Costa Rica, Peru, Venezuela, Colombia, Cuba, Paraguay, Uruguay and India.
All the work put into Selena’s Google doodle won’t entirely disappear after October 17. “Just like Selena, it will live forever - in our doodle archive,” says Campos.
This article from https://www.forbes.com/sites/veronicavillafane/2017/10/17/selena-gets-doodle-tribute-and-new-special-exhibit-on-google/#299aa6464367


Monday, October 16, 2017

Creativity in your classroom?

Creativity
WeVideo (Chrome or Drive App)
WeVideo makes video editing easy for everyone and accessible from anywhere.
Google Drawings / Canva / Piktochart / Thinglink / Slides (Web and Infographic Resources)
Resources to support visual learning and creation of visual products.
Screencastify (Chrome Extension)
Screencastify is a simple video screen capture software for Chrome and Chromebooks.

Adobe Spark (Web Resource) 
Create impactful social graphics, web stories & animated videos with Spark’s free graphic design app.

Wednesday, October 11, 2017

Looking for a Tech Grant for your school/classroom?


http://www.freetech4teachers.com/

  • Tech & Learning Grants Central - This website provides tips about writing grants as well as links to grants that are posted by their deadlines. 
  • CenturyLink Grants Teachers and Technology Grants- this is open to all educators who live in a region this is served by CenturyLink. A simple series of questions at the beginning of the grant will tell you if you are qualified or not. 
  • DonorsChoose- This service can be used to request funds to improve your classroom or for professional development. There are a few steps involved when setting up a DonorsChoose project, but it is a really good program. 
  • Teach.com Grants- List of 20 grants available to teachers.
  • EdTechTeam Grants- Apply to bring PD to your school. 
  • Edutopia Big List of Educational Grants- this list is updated on a regular basis so make sure you check back every few weeks for new opportunities. 
  • GrantWatch- Searchable list of grants for teachers. 
  • Grants.gov- hundreds of grants specifically for education.
  • TeachersCount- Dozens of grants that include a description, deadline, and maximum award. 

Monday, August 28, 2017

Are you mispronouncing kids' names? Parents? Here is help...

“It creates the sense that my teacher doesn't really care about saying your name right,” a student says.

Learning names at the beginning of the term has long been a challenge for instructors—especially when the names are ones school staff have never encountered before. As Harney County becomes increasingly diverse there are sure to be names school staff have not encountered. 

NameShouts, offers a tools for educators who want to pronounce the names of their students and parents correctly. Check it out!!!

Tuesday, August 22, 2017

Lunch with Tech

https://goo.gl/yYHP3W

Image result for LUnch with a computer


Code.org

Welcome back to school!!!!! Code.org has debuted their new courses A-F! An entirely new elementary course! A cool new feature are the Circle times stories that have been added to promote literacy! 


image not displayed

Monday, August 7, 2017

Google Classroom and Forms

Google Classroom and Forms!
https://goo.gl/Ni194r

Students NEED Technology in the Classroom

10 Reasons Today’s Students NEED Technology in the Classroom

Technology is everywhere--entwined in almost every part of our culture. It affects how we live, work, play, and most importantly learn. With mobile and other wireless devices like the IoT becoming an increasing requirement across every industry today, it only makes sense that our schools are also effectively deploying mobile technology in the classroom. However, for many schools, implementing the latest technology is a difficult strategy to navigate.
There are two main reasons for this:
  • Schools are on the fence about the use of certain mobile devices; thinking they're more a burden than a strategic learning tool.
  • Schools want to deploy mobile devices but their network infrastructure is not capable of properly supporting the technologytechnology in the classroom, why technology is important in today's schools, school wireless networks,
In both cases it's a lose lose situation for everyone involved, especially the students.
To help your school confidently make the decision to embrace mobile technology in the classroom, we've put together a list of 10 reasons why it will benefit your students.
Then, we've outlined how your school can make sure it's ready to actually support those new/added devices.

Ten Reasons Why Your Students NEED Technology in the Classroom

1) If used correctly, mobile devices and the applications they support, will help prepare students for their future careers.
2) Integrating technology into the classroom is an effective way to connect with students of all learning styles.
3) It gives students the opportunity to enhance the interaction with their classmates and instructors by encouraging collaboration.high school students using technology in the classroom
4) Using technology in the classroom gives teachers and other faculty members the opportunity to develop their student's digital citizenship skills. It's one thing to use mobile devices, it's a completely other thing to know how to use them correctly and responsibly.
5) Integrating technology in education helps students stay engaged. Most students today have been using mobile devices like tablets and smartphones to play and learn since they could crawl. So it only seems logical to align today's classrooms with the way that your students want and are used to learning.
6) Combining new tech like VR (virtual reality) with traditional classroom instruction is one example of how the introduction of new technology can enhance the learning experience and create new opportunities.
7) When mobile technology is readily available and performing correctly in the classroom, students are able to access the most up-to-date information quicker and easier than ever before.
8) The traditional passive learning model is broken. With technology in the classroom the teacher becomes the encourager, adviser, and coach.
9) Technology helps students be more responsible. Owning your own device or borrowing the school's devices gives students the opportunity to improve their decision making skills as well as taking ownership of a valuable (and often times expensive) device. Again, this needs to be complimented by proper digital citizenship training to see the best results.
10) Technology transforms the learning experience. Students have access to an incredible amount of new opportunities from learning how to code to learning how to better collaborate across teams and with their instructors. Technology empowers students to be more creative and be more connected; new tech has super-charged how we learn today.
If your school is still debating how technology can benefit your students, teachers and administrators, I hate to break it to you, but the future of education is already here and you're missing an unbelievable amount of opportunities. 

How to Support Technology in the Classroom

One of the biggest mistakes schools make when deploying or allowing new devices onto their campus and into their classrooms, is by not making sure their network infrastructure is up-to-date and/or sufficient enough to properly support their end-users.
We've seen numerous situations where schools have bought and deployed new tablets or new laptops, only to find that nothing worked because their Wi-Fi network couldn't support the new devices.
With tight budgets you can't afford to buy new devices and have them not work; you need to get it right the first time.
Your wireless network or infrastructure is what makes using new mobile devices possible. Yes, wireless is a specialized skill and yes they're not cheap, but they're also more attainable than you might think.
After engineering and deploying more than 1000+ wireless systems over the last 11 years, we've learned a lot about what should work and what actually does work.
A few of the main takeaways are:
  • Your Wi-Fi system needs to always align with the devices that are connecting to it
  • Technical resources are expensive and hard to find
  • User expectations are higher than ever
  • Everything is constantly changing (devices, applications, how we use Wi-Fi, device numbers, number users, even the physical environment)
What makes this especially challenging for schools is that Wi-Fi networks today only have a useful shelf-life of between three to four years at the very best. 
Knowing that traditionally, wireless networks cost a lot of money to design, deploy and manage, how do schools with almost no available budget get what they need?
Using Wi-Fi as a Service, your school can have the exact wireless system it needs to support any technology plan it wants to implement. Whether it's new tablets as part of a 1:1 program or BYOD, Wi-Fi as a Service enables schools of any size to successfully embrace technology and the mobile devices their students want and need.
Wi-Fi as a Service offers a variety of benefits, for example:
  • Affordable monthly payments
  • Scalability to grow with your needs up or down
  • Guarantees you always have the latest system in place
  • Allows you to prioritize your budget towards other mission-critical projects
Using a subscription, Wi-Fi as a Service allows schools to budget over-time exactly what they need to deliver the best class of service to their students, staff and guests.
Want to learn more?  Check out our pricing page to compare plans and get started today!
At SecurEdge, we provide the platform that simplifies networking. If you have any questions or would like to discuss an upcoming project, please contact us here.
*Editor's note: This blog post was originally posted in September 2013 and has been completely revamped and updated for thoroughness and accuracy.
Danny Mareco