Monday, October 20, 2014

SlideShark...Repost from pjimison

As an instructor at the university level, I often need to use presentations to guide my own lecture as I share information with my students. A presentation can help keep me on a straight path.  I have battled how to view my own notes. I can't write notes into the PowerPoint section because our projector system mirrors our podium computers so if they show on the computer, they will show on the projector. Of course, I could bring my own laptop and choose the projector as a secondary source that I could use for the presentation view, but I don't like to do that either. I can print off notes - but I feel like carrying around a stack of papers and trying to give a quick glance down at my notes is tacky.
I've tried using my iPad for notes and using a clicker to change slides because I like to walk around the room. That's just too much to hold and I fumble around trying to figure out which one I'm clicking. Then, I talked to GLEN and he shared with me SlideShark. Thanks, Glen!
First, load your presentation, with notes, into the FREE SlideShark app. Next, click "broadcast" in the app and send the broadcast URL to your email. On the podium computer, pull up the email and open the link.  The presentation will show to the class via the projector and you can control the slides from your iPad. The nicest thing? I can see my notes in the app while I control the presentation. It even has an annotation tool and laser pointer controlled through the app. I can easily walk around the room, talk, control the presentation, and see my notes without trying to hook up to the Apple TV. That's right, Jessup instructors! It doesn't matter which room you are in.You don't need Apple TV!
Student view on the screen - They see the presentation!
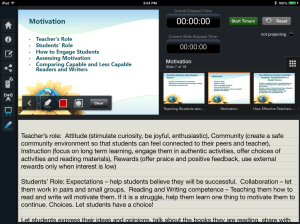
Teacher can choose to just see and control the slides on the iPad.
Here it is on the teacher/iPad view with notes. Just tap the slides to advance to the next one.
Look closely and you'll see the choice to write on the presentation with annotation tools!
Learn more by watching this quick video:

Wednesday, October 15, 2014

Do you Snip? If not, you should!

I was checking my mail the other day and a blogpost from Frank Buck came up about snipping. I thought...c'mon, everybody does that...waste of time!  I was sitting with a group of folks who were snooping as I read the e-mail from Dr. Buck and sure enough they thought it was pretty cool. I showed them the ins and outs of the snipping tool and we now have another group of snippers. Here is a repost from Dr. Buck and here is hoping you become a snipper.

Do You Know About the "Snipping Tool"?


Today's newsletter is all about the "Snipping Tool" in Windows. I am sharing it with you for two reasons:
  1. As I work with educators in various locations, few know about this feature.
  2. The Snipping Tool is so valuable, I use it multiple times every day.
Most people are familiar with the concept of "Print Screen." Pressing that button copies the entire screen to the clipboard, where it can now be pasted into a document or PowerPoint presentation. Some people know about Alt + Print Screen, which copies the active window.

What if you don't need the entire screen or even an entire window? What if you only need one image or want to take a snapshot of one paragraph of text? That's where the Snipping Tool becomes gold.

The Snipping Tool made its debut in Windows Vista, and is alive and well in Windows 7 and Windows 8. To find it, click "Start" and key the words "Snipping Tool" into the search window. Your result will appear.


Once you realize the value of this little tool, you will likely use it regularly. Pin it to either the Start menu or the Task Bar so that it is close at hand. Right-click on "Snipping Tool" and choose the desired location.


Click the Snipping Tool. The screen will dim and a small dialogue will appear which says, "Drag the cursor around the area you wish to capture." Release the mouse button, and a window containing the snipped image appears . Below is an example.


The most common continuation is to save the snip, probably to the desktop. It now operates just like any picture. You can drag it into a Word document or PowerPoint presentation. You can email it as an attachment. Windows immediately copies the snip to the clipboard. Because it's on the clipboard, even before saving the snip, you may paste the snip into a document.

 
Where Could You Use the "Snipping Tool"?
  1. Do you compose reports which require graphs? If the graph has already been created and you can bring it to the screen, you can snip it and paste it into your document.
  2. Do you use screen shots from your computer in PowerPoint slides? You rarely need the entire screen. Instead of having to crop the tool bars and other extraneous matter, snip only the part you need.
  3. Do you need to capture small pictures from the screen? What about the need to capture only a portion of the picture? The Snipping Tool is the answer.
  4. Do you find yourself viewing a set of directions on-screen, but those directions involve moving away from that screen, meaning you no longer see those instructions. Instead of printing it all on paper, snip those directions. The set is now safe and sound in its own window.
  5. Do you make airlines reservations, hotel reservations, or order goods online? Your screen will display your confirmation number. While an email of that confirmation will be forthcoming, why not snip the confirmation right off the screen in the mean time. Save it to the desktop and then trash it once the email confirmation arrives.
Are you reading this newsletter on your desktop or laptop computer? If so, why not give the Snipping Tool a try. Snip a paragraph and try saving it on your desktop. Open a Word document and use the "Paste" command to add the snip. Try dragging a snip from your desktop into a Word document.

I would like to hear how you are using the Snipping Tool. Come on over to my Facebook page and let me know.

If you learned something new, why not share it with others? Below, you will see a link where you can forward newsletter to a friend.

Frank Buck Signature

Monday, October 6, 2014

Students can be better Googlers


http://www.educatorstechnology.com/2014/10/a-must-see-poster-featuring-7-google.html

Thursday, October 2, 2014

Number Line

Number Line

Integrating Math Manipulatives into a classroom can provide a rich experience for kids learning about math concepts and number sense.  One manipulative that is most likely under utilized is the number line.


Clarity Innovations has created a free Number Line App for the iPad.  This app can be used to help students visualize the four major mathematical operations.


Options in the app allow you to change the tic marks for several different common increments, or you can even enter in your own custom numbering.  There is a setting for tic mark spacing, and a setting to cover up the tic mark labels. 


 Once you adjust your settings, you can use the text tool to type in numeric expressions or equations.


Finally there is a jump tool where you can bring in your jumps, as many as you like, both forward and backwards for addition and subtraction.  The jump interval can be manipulated to be as long or short as you wish, with the interval visible or not. 


An annotation tool allows you to add free hand items for additional clarity.


Currently this app is limited to just positive numbers. Several people have posted comments requesting to have the number line extend into negative numbers.  The app also does not provide a way to share your work, so if you want students to create images they would need to take a screen shot of their iPad using Home - ON/OFF sequence.

The Number Line App is a great resource for elementary students learning the concepts of addition, subtraction, multiplication, and division while also strengthening their number sense.
 Repost from Joe Buglione @ http://ideviceinthemtns.blogspot.com/search?updated-max=2014-09-05T11:36:00-07:00&max-results=7